

Overview
In this blog, I will configure and set up email parameters for sending an email in Dynamics 365 finance and operation using a custom email template.
Using email templates in D365 F&O offers significant benefits in consistency, efficiency, accuracy, personalization, compliance, professionalism, automation, and localization. Templates help ensure that communications are professional, timely, and aligned with the organization’s standards and regulatory requirements.
Moreover, email templates can be customized to include dynamic content, allowing for personalization while maintaining uniformity. This ensures that each recipient receives relevant information tailored to their specific context, increasing engagement and satisfaction.
In this blog, I will do the following 4 tasks.
1. Set up email parameters
2. Send a simple email to test the connection.
3. Send a single row/record of a table in an email using an email template.
4. Send multiple rows/records of a table in an email using an email template.
Task 1: Set up email parameters:
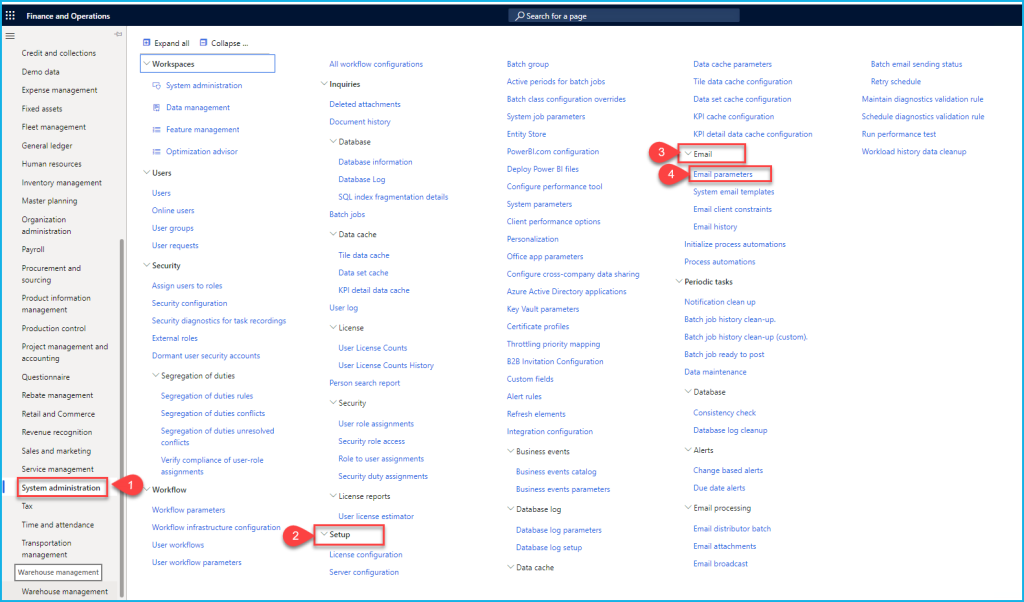
First Set Up the Email parameter in Dynamics 365 by clicking on System Administrations -> Setup -> Email -> Email parameter:
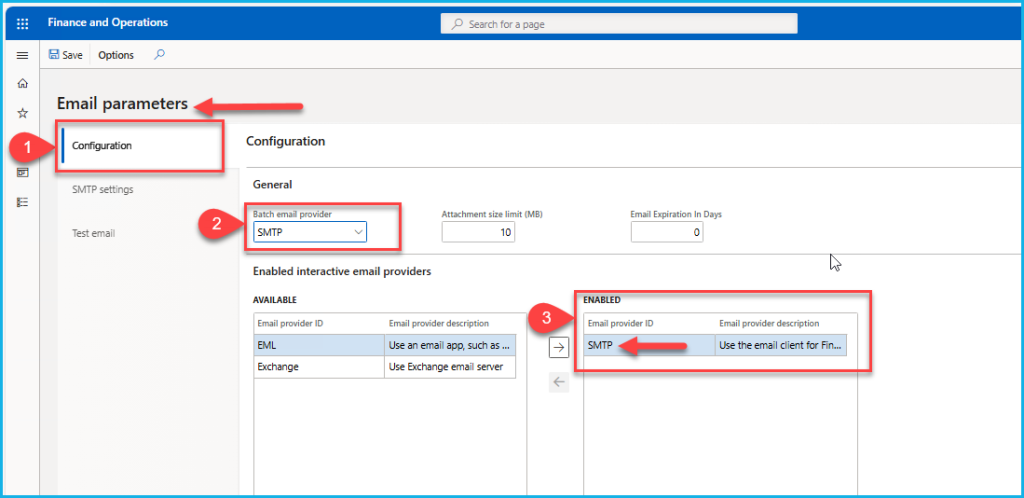
Click on Configuration:
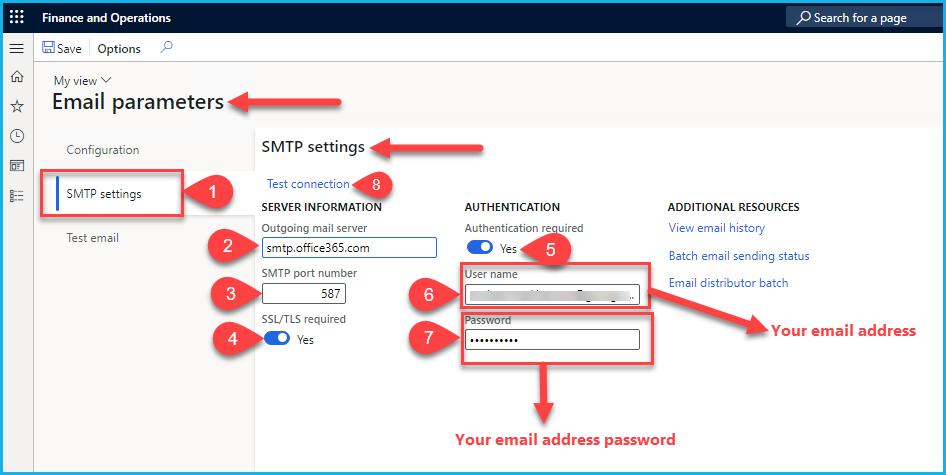
Now click on SMTP Setting, In last, in step 8, click on “Test connection”. Here confirm your admin username and password and test connection. The following message should appear:
Successfully connected to the outgoing mail server. To confirm your email is configured correctly, visit the ‘Test email’ tab to send a test message.
Now Send the test Email to confirm the settings (step 5). Ensure “Send as” is set to your admin user, if your configuration is correct, your receiver will receive an email with a time stamp and one attachment. The following message should appear on the screen:
A test email was sent at 2024-06-25T17:43:16
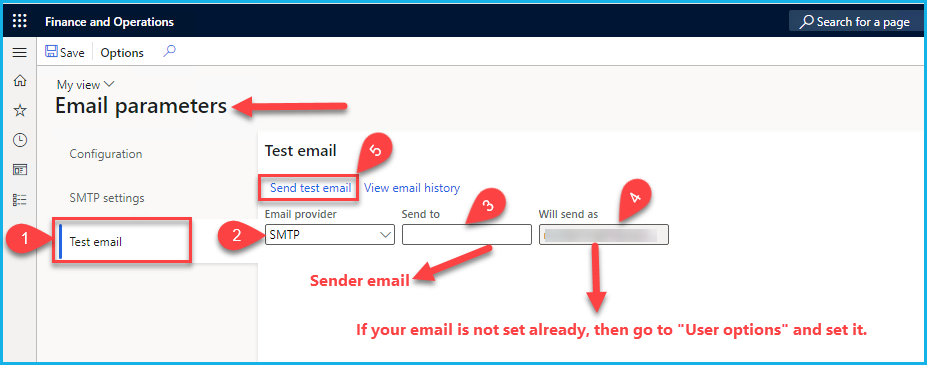
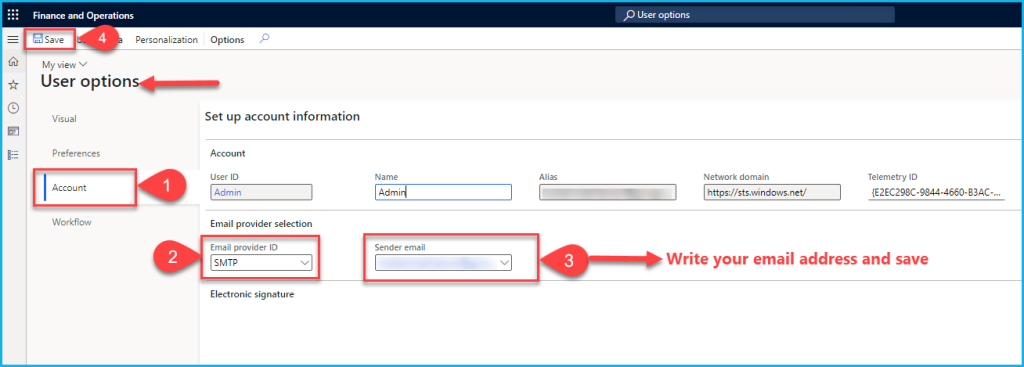
If your email is not set as your admin email, you can set this by clicking on the settings Icon –>User options –> Account or type “User options” in “Search”. Here select the sender Email as your admin email:
Task 2: Send a simple email to test the connection.
First of all, I send a simple email to test the connection.
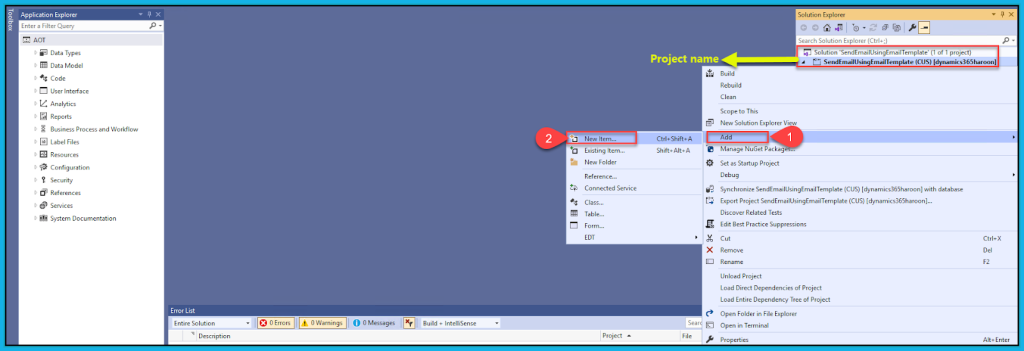
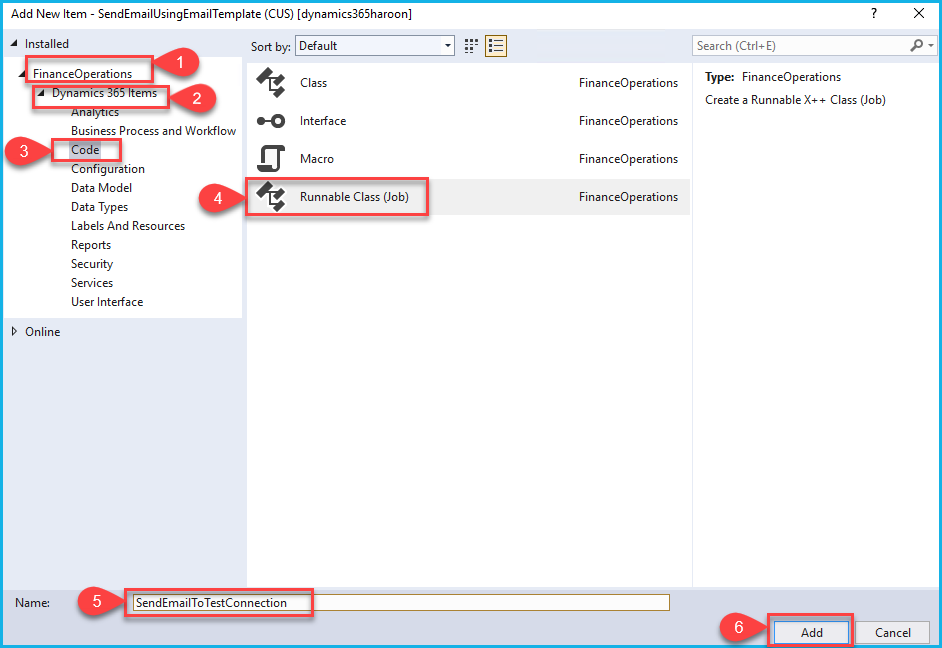
Create New Project In Visual Studio, right-click on project Add -> New Item-> Dynamic 365 Items -> Code-> Runnable Class (job):
internal final class SendEmailToTestConnection
{
public static void main(Args _args)
{
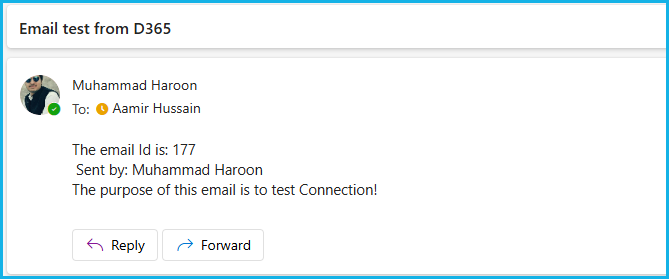
str Id = "177";
str name = "Muhammad Haroon";
str body = "The purpose of this email is to test Connection!";
SendEmailToTestConnection::mailerSender(Id, name, body);
}
public static void mailerSender(str _id, str _name, str _body)
{
SysMailerMessageBuilder messageBuilder = new SysMailerMessageBuilder();
Email toEmail;
Email fromEmail;
try
{
fromEmail = "Sender email address";
toEmail = "Receiver email address
messageBuilder.setBody("The email Id is: " + _id + "\n" + "Sent by: " + _name + "\n" + _body, false);
messageBuilder.setSubject("Email test from D365");
messageBuilder.addTo(toEmail);
messageBuilder.setFrom(fromEmail);
// Sends a message interactively, allowing the user to view and modify the message before
SysMailerFactory::sendNonInteractive(messageBuilder.getMessage());
// Try using sendNonInteractive method too
Info("Email sent successfully");
}
catch (Exception::Error)
{
throw error("@SYS33567");
}
}
}
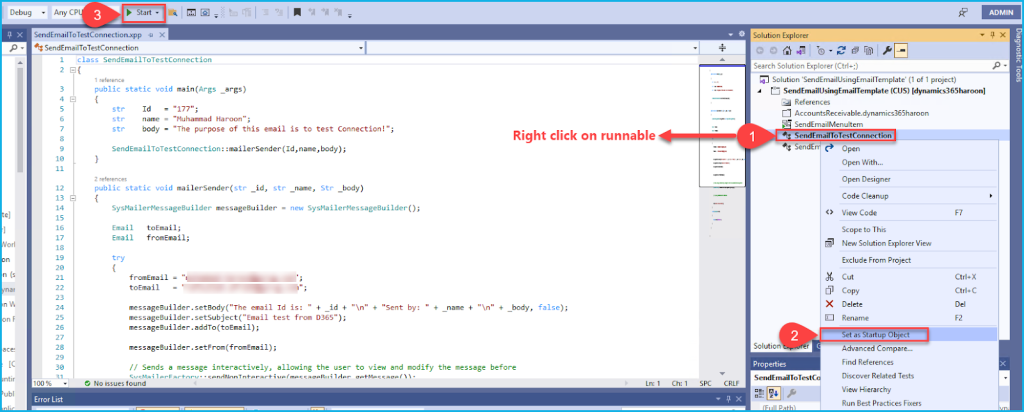
Build your project, set your class as a startup object, and run your project. Check the email at the receiver end.
Email at the receiver end:
Task 3: Send a single row/record of a table in an email using an email template:
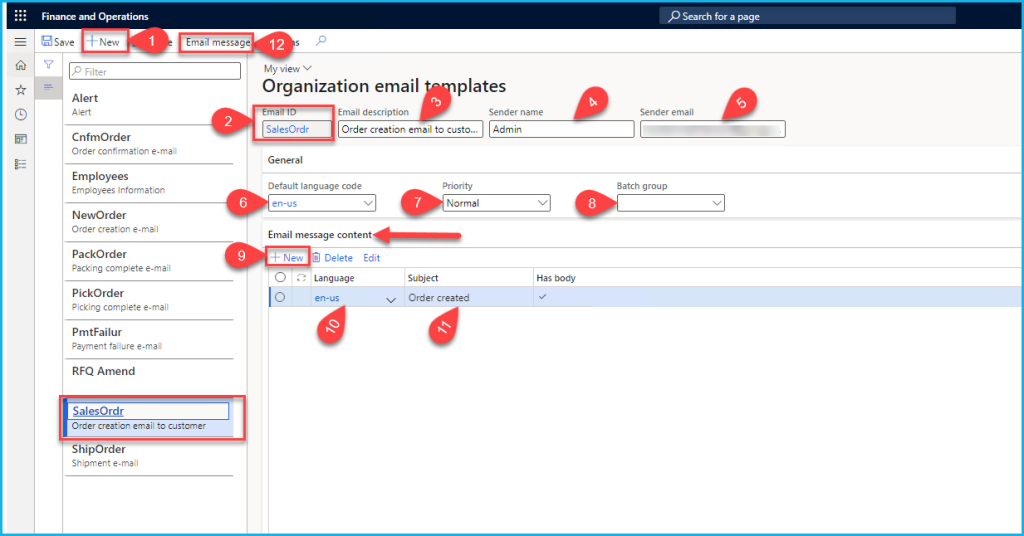
First I create an email template:

Create a new email template and follow all steps one by one, see the screenshot below:
1. New
2. Give a unique name to your template “Email ID” = “SalesOrdr”
3. Email description
4. Sender name
5. Sender email
6. Select the default language code
7. Select priority = Normal
8. Batch group = Empty batch group
Then go down to “Email message content”
9. New
10. Again select a language
11. Subject
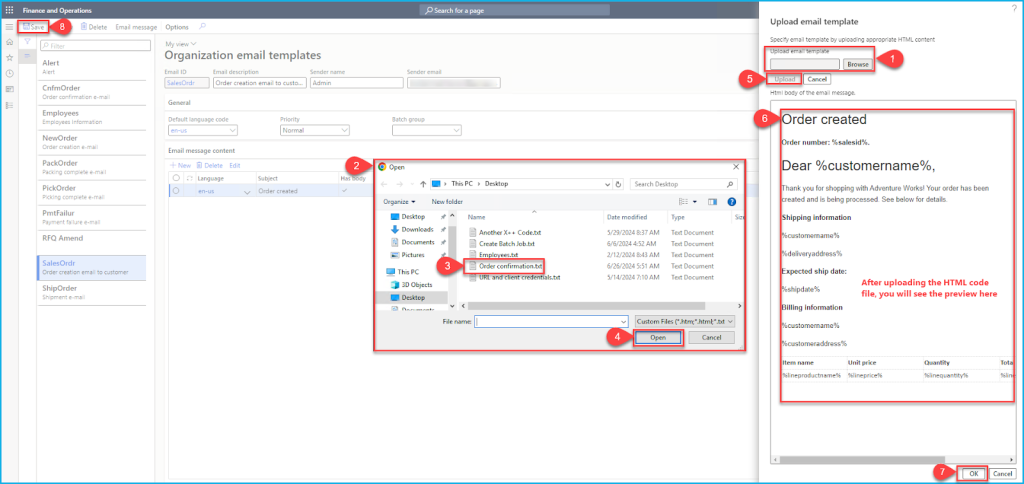
12. Go up and click on “Email message”, here I will upload the HTML file.
Before uploading the HTML code, You must create a txt file consisting of HTML code.
HTML Code:
<!DOCTYPE html>
<html>
<head>
<style>
          table, th, td {
           border: 1px solid black;
           BORDER-COLLAPSE: collapse;
           FONT-FAMILY: Calibri;
           TABLE-LAYOUT: fixed;
           WIDTH: 600px
}
</style>

    <meta charset="UTF-8">
    <h1>Order created</h1>
    <p><strong>Order number: %salesid%.</strong></p>
</head>

<TBODY>
<h1>Dear %customername%,</h1>
<p>Thank you for shopping with Adventure Works! Your order has been created and is being processed. See below for details.</p>
<p><strong>Shipping information</strong></p>
<p>%customername%</p>
<p>%deliveryaddress%</p>
<p><strong>Expected ship date:</strong></p>
<p>%shipdate%</p>
<p><strong>Billing information</strong></p>
<p>%customername%</p>
<p>%customeraddress%</p>
<TABLE>
<TR>
<TH style="WORD-WRAP: break-word; TEXT-ALIGN: left; WIDTH: 120px">Item name</TH>
<TH style="WORD-WRAP: break-word; TEXT-ALIGN: left; WIDTH: 140px">Unit price</TH>
<TH style="WORD-WRAP: break-word; TEXT-ALIGN: left; WIDTH: 140px">Quantity</TH>
<TH style="WORD-WRAP: break-word; TEXT-ALIGN: left; WIDTH: 200px">Total price</TH>
</TR>
<TR>
<TD style="WORD-WRAP: break-word; TEXT-ALIGN: left; WIDTH: 120px">%lineproductname%</TD>
<TD style="WORD-WRAP: break-word; TEXT-ALIGN: left; WIDTH: 140px">%lineprice%</TD>
<TD style="WORD-WRAP: break-word; TEXT-ALIGN: left; WIDTH: 140px">%linequantity%</TD>
<TD style="WORD-WRAP: break-word; TEXT-ALIGN: left; WIDTH: 200px">%linenetamount%</TD>
</TR>
</TABLE>
</TBODY>
</html>
After clicking “Email message”, a new screen will be opened to browse and upload the HTML code. Save the HTML code in the txt file before uploading the file.
Create a new runnable class, paste the below code, and build and run the project:
Right-click on project Add -> New Item-> Dynamic 365 Items -> Code-> Runnable Class (job): Class name = “SendEmailWithSingleRecord”
Note: In the x++ code, a single record will be fetched.
X++ Code:
internal final class SendEmailWithSingleRecord
{
    public static void main(Args _args)
    {
        SendEmailWithSingleRecord::generateEmail();
    }
    public static void generateEmail()
    {
        str           emailSenderName, emailSenderAddr, emailSubject, emailBody, emailToAddress;
        SalesId       salesId;
        SysEmailId    emailId;
        SalesTable    salesTable;
        SalesLine     salesLine;
        CustTable     custTable;
        ContactPerson contactPerson;
        Map           templateTokens;
        salesTable = SalesTable::find("000002"); //Sales Id in USMF
        salesLine  = SalesLine::find(salesTable.salesId);
        custTable  = CustTable::find(salesTable.CustAccount);
        emailToAddress = "Receiver email address";
        emailId        = "SalesOrdr";
        templateTokens = new Map(Types::String, Types::String);
        templateTokens.insert("salesid", salesTable.SalesId);
        templateTokens.insert("customername", custTable.name());
        templateTokens.insert("deliveryaddress",     salesTable.deliveryAddress().Address);
        templateTokens.insert("customeraddress", custTable.address());
        templateTokens.insert("shipdate", strFmt("%1", salesTable.ShippingDateRequested));
        templateTokens.insert("lineproductname", salesLine.itemName());
        templateTokens.insert("lineprice", strFmt("%1", salesLine.SalesPrice));
        templateTokens.insert("linequantity", strFmt("%1", salesLine.SalesQty));
        templateTokens.insert("linenetamount", strFmt("%1", salesLine.LineAmount));
        if (emailId)
        {
            [emailSubject, emailBody, emailSenderAddr, emailSenderName] = SendEmailWithSingleRecord::getEmailTemplate(emailId, custTable.languageId());
        }
        var messageBuilder = new SysMailerMessageBuilder();
 messageBuilder.addTo(emailToAddress).setSubject(emailSubject).setBody(SysEmailMessage::stringExpand(emailBody, SysEmailTable::htmlEncodeParameters(templateTokens)));

        if (emailSenderAddr)

        {
            messageBuilder.setFrom(emailSenderAddr, emailSenderName);
            SysMailerFactory::getNonInteractiveMailer().sendNonInteractive(messageBuilder.getMessage());
        }
    }
    protected static container getEmailTemplate(SysEmailId _emailId, LanguageId _languageId)
    {
        var messageTable = SysEmailMessageTable::find(_emailId, _languageId);
        var emailTable = SysEmailTable::find(_emailId);
        if (!messageTable && emailTable)
        {
            // Try to find the email message using the default language from the email parameters
            messageTable = SysEmailMessageTable::find(_emailId, emailTable.DefaultLanguage);
        }
        if (messageTable)
        {
            return [messageTable.Subject, messageTable.Mail, emailTable.SenderAddr, emailTable.SenderName];
        }
        else
        {
           warning("@SYS135886"); // Let the user know we didn't find a template
            return ['', '', emailTable.SenderAddr, emailTable.SenderName];
        }
    }
}
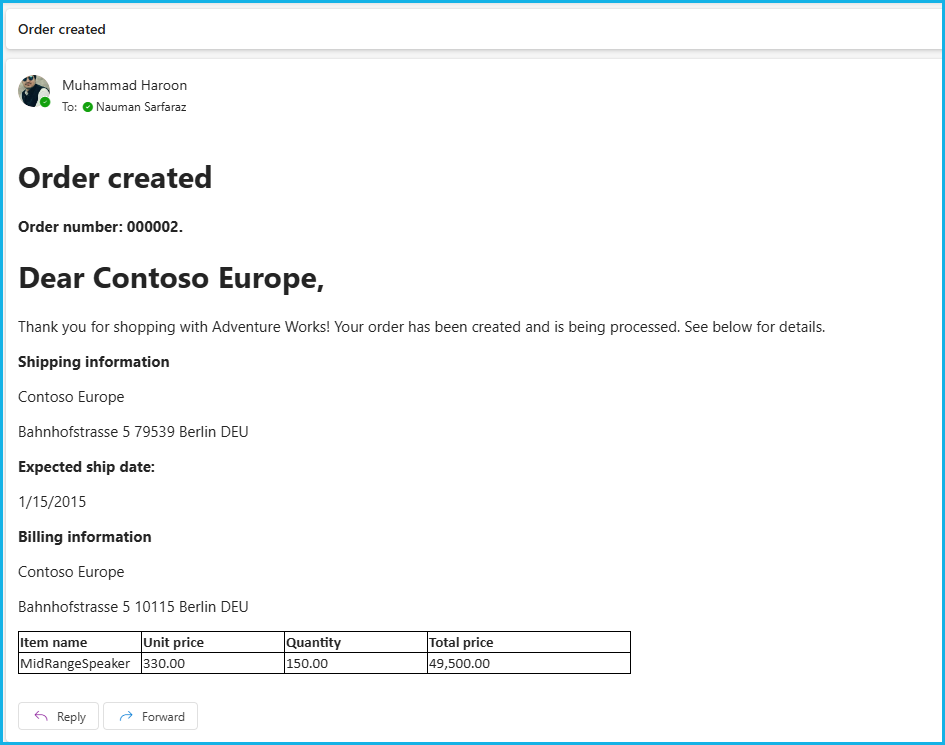
Email at the receiver end:
Task 4: Send multiple rows/records of a table in an email using an email template.
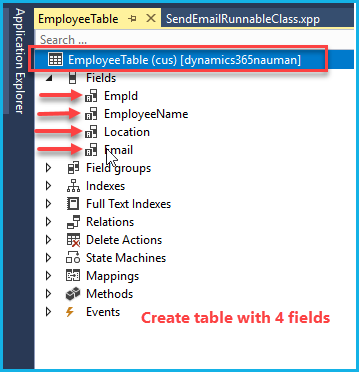
First, create a table named “EmployeeTable”. Which consists of four fields. Insert data in that table through SQL directly or using a runnable class.
Now create another email template that shows multiple rows/records from a single table or multiple tables.
The creation of this email template is the same as that created above. Now this time Email ID = “Employees”.
Before uploading the HTML code, You must create a txt file consisting of HTML code.
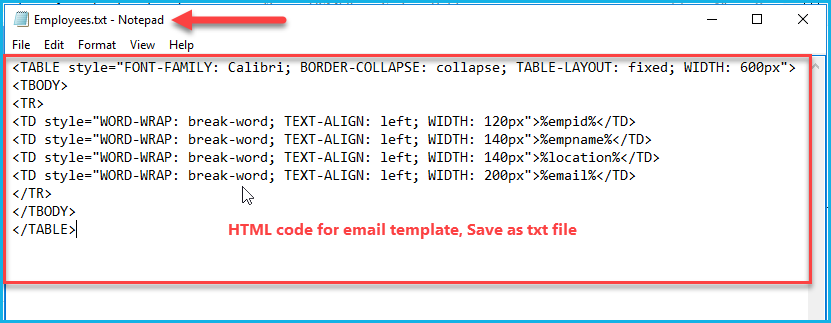
HTML Code:
<TABLE style="FONT-FAMILY: Calibri; BORDER-COLLAPSE: collapse; TABLE-LAYOUT: fixed; WIDTH: 600px">
<TBODY>
<TR>
<TD style="WORD-WRAP: break-word; TEXT-ALIGN: left; WIDTH: 120px">%empid%</TD>
<TD style="WORD-WRAP: break-word; TEXT-ALIGN: left; WIDTH: 140px">%empname%</TD>
<TD style="WORD-WRAP: break-word; TEXT-ALIGN: left; WIDTH: 140px">%location%</TD>
<TD style="WORD-WRAP: break-word; TEXT-ALIGN: left; WIDTH: 200px">%email%</TD>
</TR>
</TBODY>
</TABLE>
Now upload the HTML file:

X++ Code:
internal final class SendEmailWithMultipleRecords
{
    public static void main(Args _args)
    {
        SendEmailWithMultipleRecords::generateEmail();
    }
    public static void generateEmail()
    {
        str           emailSenderName, emailSenderAddr, emailSubject, emailBody, emailToAddress;
        SysEmailId    emailId;
        CustTable     custTable;
        emailToAddress = "Receiver email address";
        emailId        = "Employees";
        if (emailId)
        {
            [emailSubject, emailBody, emailSenderAddr, emailSenderName] = SendEmailWithMultipleRecords::getEmailTemplate(emailId, custTable.languageId());
        }
        var messageBuilder = new SysMailerMessageBuilder();
        messageBuilder.addTo(emailToAddress).setSubject(emailSubject).setBody(emailBody);
        if (emailSenderAddr)
        {
            messageBuilder.setFrom(emailSenderAddr, emailSenderName);
            SysMailerFactory::getNonInteractiveMailer().sendNonInteractive(messageBuilder.getMessage());
        }
    }
    protected static container getEmailTemplate(SysEmailId _emailId, LanguageId _languageId)
    {
        str           _emailBody;
        EmployeeTable employeeTable;
        Map           templateTokens;
        var messageTable = SysEmailMessageTable::find(_emailId, _languageId);
        var emailTable = SysEmailTable::find(_emailId);
        if (!messageTable && emailTable)
        {
            // Try to find the email message using the default language from the email parameters
            messageTable = SysEmailMessageTable::find(_emailId, emailTable.DefaultLanguage);
        }
        if (messageTable)
        {
            templateTokens = new Map(Types::String, Types::String);
            // For table header
            templateTokens.insert("empid",    "Employee ID");
            templateTokens.insert("empname",  "Employee Name");
            templateTokens.insert("location", "Location");
            templateTokens.insert("email",    "Email Address");
            _emailBody = _emailBody + SysEmailMessage::stringExpand(messageTable.Mail , SysEmailTable::htmlEncodeParameters(templateTokens));
            while select EmpId, EmployeeName, Location, Email from employeeTable
            {
                // This will replace variable with actual value
                templateTokens.insert("empid",    employeeTable.EmpId);
                templateTokens.insert("empname",  employeeTable.EmployeeName);
                templateTokens.insert("location", employeeTable.Location);
                templateTokens.insert("email",    employeeTable.Email);
                // Old body is concatinated with the new body, eg. Table header + first row or all records of the table
                _emailBody = _emailBody + SysEmailMessage::stringExpand(messageTable.Mail , SysEmailTable::htmlEncodeParameters(templateTokens));
            }
            return [messageTable.Subject, _emailBody, emailTable.SenderAddr, emailTable.SenderName];
        }
        else
        {
            warning("@SYS135886"); // Let the user know we didn't find a template
            return ['', '', emailTable.SenderAddr, emailTable.SenderName];
        }
    }
}
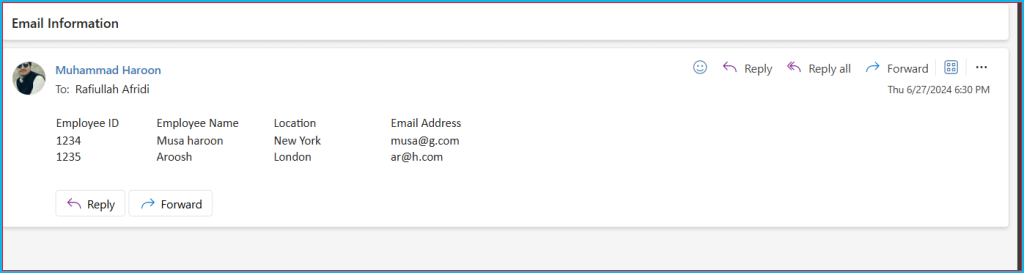
Email at the receiver end:

